
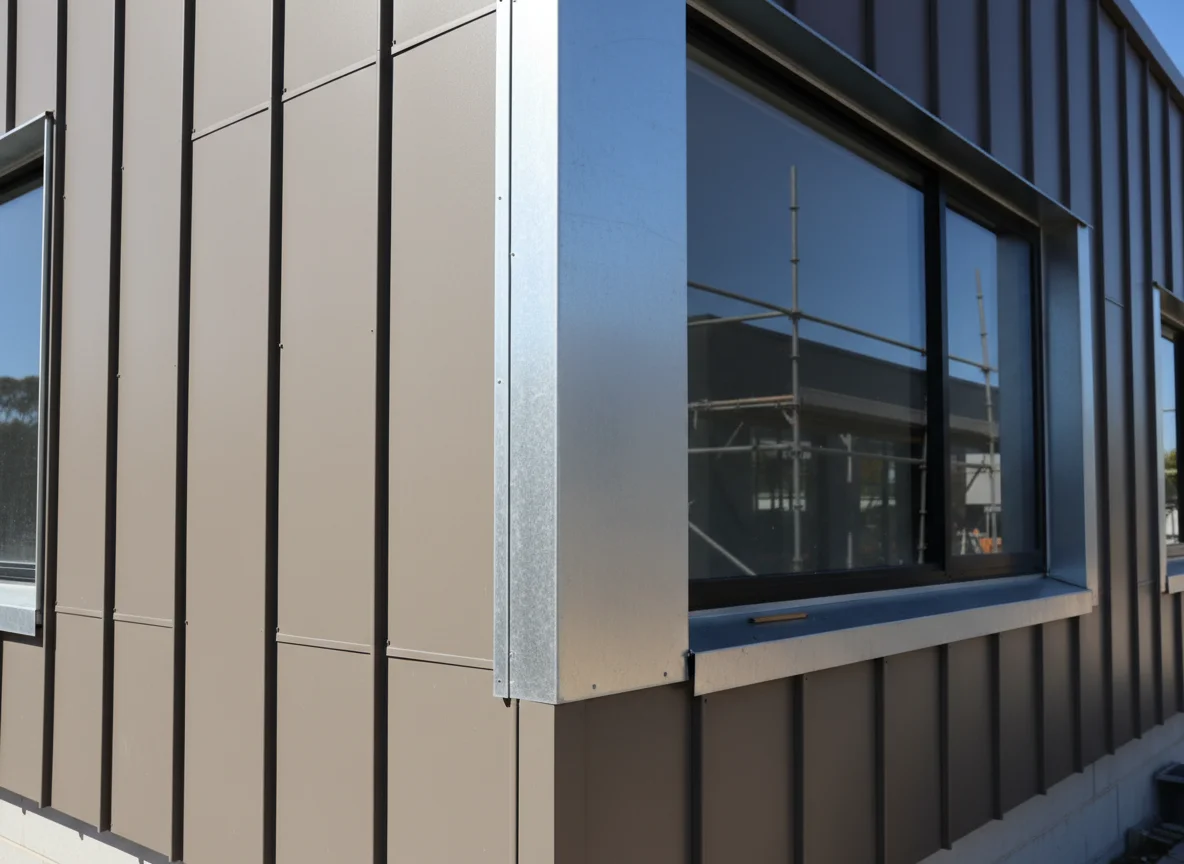
Head, sill, jamb and corner are the four places to name before an opening trim package is discussed. Each one interrupts the cladding in a different way. The head sets the upper break, the sill sets the lower return, the jambs control the side edges and any nearby corner flashing decides how the wall turns away from the opening.
Treat every window, door or louvred opening as its own small elevation. That keeps the brief practical. Instead of asking for one broad wall package and leaving the trims to be inferred, the project team can show the head, sill, left jamb, right jamb and corner relationship for each opening that appears on the wall.
Opening Map before Part Names
Begin with the opening reference, not the product name. Steel roofing and building materials may sit in the same pack when sheets are listed. A window marked W1, a doorway marked D2 or a louvre marked L1 should each have its own set of notes. Beside that reference, record the cladding direction, profile, visible face, colour or finish, and the wall zone it sits within. That small map stops the order from becoming a loose list of cladding sheets and unnamed trims.
Map Sheets Around the Opening
A useful opening map separates the main sheet field from the interrupting pieces. Mark the sheets above the head, the sheets below the sill, the side pieces or returns beside the frame and the nearest internal or external corner. If the wall has vertical sheets, show how the run stops above and below the opening. If it has horizontal sheets, show how the banded set-out meets the side edges.
The opening is not only a head flashing or only a corner piece. It is a small set of relationships that need to be clear before the metal components are named. Aluminium pressings may sit in the same pack when the project names that material.
Head Module: The Upper Break
The head piece controls the top line of the opening. The FAQ covers how we take an enquiry and what we do not install. It may sit under a sheet edge, align with another opening, continue a trim line or provide a visual stop beneath cladding. In the brief, it should be described by its relationship to the cladding profile and wall zone, not just by a length.
For each head, state the opening reference, cladding direction above it, visible face, finish side and related trim. If several openings share the same upper line, say whether the head pieces are intended to repeat. If one opening is different, give it a new reference rather than forcing it into a typical note.
The Wesroof Metal Cladding 280 source supports a cladding conversation around exterior walls and architectural facades, with broad coverage and clean lines as part of the profile’s purpose. Around openings, those clean lines rely on the supplied information being specific. A broad sheet field can be visually tidy on its own and still become untidy at the head if the trim start, stop and face are unclear.
A head note can stay concise. It does not need to solve the whole opening detail. It only needs to show what the project has decided: the line being followed, the profile relationship, the visible finish and whether the head piece is a trim, flashing, pressing or related sheet item.
Sill Module: The Lower Return
The sill is not simply the head repeated upside down. It may sit above a lower sheet zone, a base trim, a feature panel or a change in orientation. It may also be more visible than expected when shadow catches the fold. That is why the sill should have its own note even when it shares a colour with the surrounding wall. Wesroof keeps that with the fabrication enquiry.
A clear sill note names the opening reference, the cladding directly below, the finish side, the intended visible face and any adjacent lower trim. If the sill aligns with other openings, mark the alignment. If it deliberately breaks alignment, mark that too. Do not leave the workshop to decide whether the lower edge should follow the head logic or a different wall line.
Opening location and frame relationship affect how the metalwork is described. A sill at a recessed opening is not the same conversation as a sill sitting on a flat sheet field. Stainless steel pressings may sit beside a named stainless run.
Colour and finish decisions also belong in this sill module. COLORBOND material sources show colour and finish as separate selection areas and recommend actual samples before purchase because screens can vary. For a supply brief, name the selected colour or finish in the file rather than relying on a rendered image or screenshot.
Jamb Module: The Side Edges
Jambs are where the sheet run, return, reveal and trim language often become blurred. The left jamb might sit against a full sheet. The right jamb might sit close to a corner. One side might need a visible return while the other side disappears into another material. If the drawing only says trim around opening, those differences are hidden.
Left Jamb and Right Jamb
Write the two side notes separately. Left jamb and right jamb should each state the adjacent sheet zone, face direction, finish side and relationship to the opening frame or reveal. If both sides are identical, the notes can say so. If they are handed, mirrored or affected by a corner, the schedule should not pretend they are the same.
This is the point where the corner piece should be brought into the same conversation if the opening is close to the wall end. The corner may need a separate trim, a return, an internal corner piece, an external corner piece or a folded component supplied with the cladding order. The exact shape belongs in the supplied drawing, but the enquiry should at least show whether the jamb and corner are related.
Wesroof’s custom metal flashings and construction pressings page covers bespoke flashings, gutters, downpipes and specialised trims for construction and building work, using materials such as Colorbond Steel, Zincalume and galvanised steel, with other options upon request. That supports a pressing-led brief for opening trims and edge pieces when the project supplies the dimensions, finish side and relationship between parts.
Corner Module: The Wall Turn
An external corner can look like a single vertical line on an elevation, but it is usually a sequence. One cladding field ends, another begins, a visible face turns, the colour side needs to remain intentional and the corner trim has to sit with the opening pieces nearby. If a window sits close to that turn, the corner module may influence the width and appearance of the side piece beside the opening.
Avoid using only the label corner flashing. State whether the piece relates to an internal corner, external corner, return, edge trim or feature transition. Show the sheet direction on both wall faces and mark which face is visible. If the cladding changes from vertical to horizontal around the corner, present that as a deliberate condition in the brief.
Wall trims and corner connections vary by profile and orientation. Do not copy a generic shape across every job. Light fabrication may apply if several prepared parts become one supplied item.
Schedule the Opening as One Small Set
Once the modules are described, turn them into a compact opening schedule. About Us covers the fabrication and supply scope. For each opening, list the opening reference, cladding direction, cladding finish, head piece, sill piece, left jamb, right jamb and any nearby corner trim. Add whether each item is a standard nominated trim, a custom pressing or a related sheet item. If a piece is excluded because it belongs to another package, mark that exclusion clearly.
Only Repeat Genuine Matches
Repeat openings can share a detail reference only when the repeat is genuine. If a wall has three similar windows but one sits close to a corner, give the corner-affected opening its own line. That small difference matters more than a tidy schedule. It lets the workshop see which pieces repeat and which pieces need separate attention.
A schedule can also show grouping for fabrication and supply. If cladding sheets, head pieces, jamb pieces and corner trims need to be grouped by elevation, state the elevation or stage. Keep that grouping note separate from design responsibility or site fitting. It is a handover aid, not a claim that the supplier is coordinating the building work.
Late Scope Check before Sending
An opening brief for Wesroof should identify the cladding, trims, flashings, pressings and related supplied materials by opening. Approval of the wall system, site fitting, certification and project design responsibility remain outside that request.
That boundary is easiest to respect after the opening modules have been recorded. The project team can send drawings, sketches, quantities, finish selections and opening references. Wesroof can then discuss the fabrication and supply elements that sit within the supplied information. If the opening depends on a builder’s method, architect’s note, engineer’s document or certifier’s decision, include the resulting requirement rather than asking the supplier to become that responsible party.
Final Check for an Opening-Ready File
Run one last pass across the elevation. Does every opening have a head, sill, left jamb and right jamb note?
If those answers are visible in the file, Contact us to send the elevation, opening schedule and finish notes.

Leave A Comment