
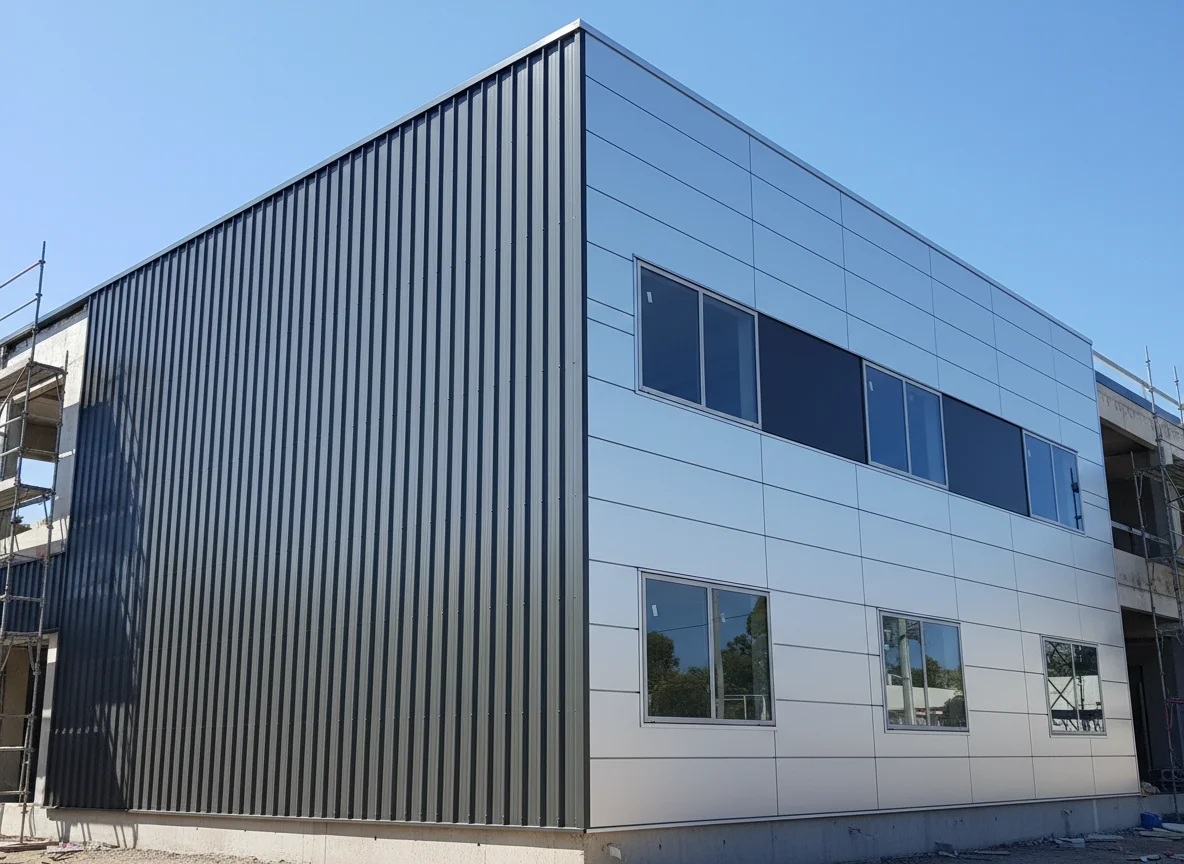
If your drawing shows vertical COLORBOND wall cladding on one elevation and horizontal COLORBOND wall cladding on another, read the page in two paths. Vertical layouts need early thinking about sheet starts, jambs, corners and feature-panel breaks. Horizontal layouts need early thinking about datum lines, long visual runs, heads, sills and corner alignment.
Both paths meet at the same supply question later: which sheets, trims and custom pressings are being ordered from the current drawings? The orientation decision changes the schedule because it changes how the profile meets openings, edges, colour breaks and adjacent wall planes.
Choose Your Path before Comparing Finishes
Orientation is often discussed as a style choice, but it quickly becomes a set-out choice. The same cladding family can produce two different document needs. Aluminium pressings may sit in the same pack when the project names that material.
Wesroof’s Metal Cladding 280 source states that the profile is suitable for vertical and horizontal application on various building types. It also describes a linear architectural finish for exterior walls and façades, with Colorbond or Zincalume given as material examples. Treat this as a supply capability for nominated components, not as a universal decision for every wall.
Before comparing colours or trim finishes, decide which reader path applies to each wall area:
- vertical path for feature walls, narrow bays, upward visual lines and side-to-side module decisions
- horizontal path for long façade lines, base-to-top setting out and head or sill alignment
- mixed path where an elevation changes orientation or meets another plane
The schedule should name the path for each elevation. If it does not, the cladding order can look complete while the set-out remains unclear.
Vertical Path: Start with Sheet Starts and Stops
Vertical cladding runs the module up and down the wall. That makes sheet starts, stops, side margins and vertical junctions the first checks. A façade may need a balanced feature panel, a clean corner return, a controlled junction with another wall material or a clear break at a door or window jamb.
Vertical Path Questions
For the vertical path, the order preparation questions are:
- Which elevations use the vertical orientation?
- Where does the first sheet start?
- Where does the last sheet finish?
- How are external and re-entrant corners treated?
- Which windows or doors need jamb trims or custom flashings?
- Are feature panels separated from field cladding in the schedule?
A vertical wall cannot borrow a horizontal set-out note without checking the drawing. Stainless steel pressings may sit beside a named stainless run.
The supply schedule should show the wall area, sheet quantities, material, finish and separate trims. It should not ask the supplier to decide whether the visual margin is balanced or whether the framing condition suits the design.
Vertical Path: Make Corners and Openings Visible
Openings control much of the vertical route. A window can interrupt a panel sequence. A door can change the sheet grouping. A corner can require a separate trim, folded flashing or stop detail. If these elements are not visible in the schedule, the order is not ready for clear supply discussion.
Draw the vertical path as a list of wall zones. For each zone, record the opening references, corner treatments and cladding orientation. Then attach the relevant trim details. If a custom folded piece is needed, provide a measured section and identify the visible face.
Wesroof’s custom metal flashings and construction pressings service is relevant where the cladding path needs bespoke flashings, specialised trims, gutters or downpipes made from site-specific measurements and architectural drawings. Keep those pieces separate from the cladding sheets so the order does not blur sheet supply with fabricated items.
Vertical schedules also need colour discipline. A feature wall might use one nominated finish while adjacent trims use another. If that happens, list the finish beside the sheet group and again beside the trim group. Do not leave colour-side direction to a general note at the end.
Horizontal Path: Set the Datum First
Horizontal cladding reads across the wall. Long lines make the datum more obvious, so the first question is where the eye should read the profile from. The datum might be a base line, window head, sill line, parapet, adjoining cladding break or corner return.
Horizontal Path Checks
For the horizontal path, check: Wesroof keeps that with the fabrication enquiry.
- which elevation carries the horizontal run
- where the first sheet course is set from
- how the run meets window heads and sills
- how the profile continues or stops at corners
- whether quantities are separated by elevation
- whether a transition trim is required where orientation changes
Keep set-out on the drawings. Do not ask the supplier to judge framing or alignment on site. Steel roofing and building materials may sit in the same pack when sheets are listed.
Cavity, condensation and weather-resistance stay with the project team. Include the supporting drawings. Do not transfer design judgement to the supplier. Light fabrication may apply if several prepared parts become one supplied item.
Horizontal Path: Keep Long Runs Out of One Lump Sum
A horizontal façade can look simple in a total quantity, yet be complicated by corners, openings and stage breaks. Do not send one combined number if separate elevations have different trim conditions. Break the schedule into wall areas so each line can be checked against the drawing.
Horizontal Schedule Block
A useful horizontal schedule block includes:
- elevation name
- horizontal orientation note
- sheet quantity and length information from the project schedule
- material and finish
- opening references
- corner or return trim references
- custom flashing references
- unresolved set-out questions, if any
This block is especially useful where a long wall wraps a corner or meets a vertical feature panel. If the profile lines are meant to align, the drawings should show that decision. If they are meant to stop cleanly, the trim or flashing should be named.
The horizontal path should not be reduced to appearance. It is a reader path through elevation logic, opening coordination, trim selection and order grouping.
Shared Junction Path: Compare Trims after Both Routes Are Mapped
Once the vertical and horizontal paths have been mapped, compare the junctions. Some details belong to both routes: heads, sills, jambs, corners, base lines, parapets, cladding transitions and roof-edge meetings. The difference is the direction in which the profile arrives at them.
A horizontal layout may need window heights and profile courses considered together. A vertical layout may need opening widths, side margins and jamb trim allowances described more clearly. A mixed wall may need a transition piece where the two orientations meet. These decisions should appear as named components rather than vague notes.
Shared Junction Schedule
For supply-only clarity, separate the schedule into:
- cladding sheets by orientation and wall area
- custom trims by location
- flashings by junction
- colour and finish by item group
- transition components where orientation changes
This structure lets the reader compare vertical and horizontal consequences without turning the page into a design approval exercise.
Colour Belongs to the Path, Not the Whole Façade by Default
COLORBOND selection often starts with the building appearance, but the schedule needs item-level finish notes. Name the colour from the project documents. The FAQ covers how we take an enquiry and what we do not install.
If vertical and horizontal zones use the same finish, state that against both zones. About Us covers the fabrication and supply scope. If one orientation is a feature panel and the other is a field colour, list them separately. If trims contrast with sheets, give the trim group its own colour line. If the selected material is Zincalume rather than Colorbond, keep that in the same material and finish field rather than splitting it into a loose comment.
Colour errors are easy to create when drawings show one selection, elevations show another and the email uses a shorthand description. The path-based schedule should prevent that by naming the finish beside the exact wall area and component group.
Place the Supply Boundary after the Paths Are Complete
After the orientation paths are mapped, the commercial boundary can stay compact. Wesroof can discuss supply and fabrication for nominated Metal Cladding 280 sheets and related components from the current drawings and schedules. Installation, framing assessment, weatherproofing design, engineering, certification and approval remain with the responsible project parties.
The live homepage describes custom steel and sheeting solutions for construction and industry in Western Australia. That is fabrication and supply, not installation.
This late boundary keeps the comparison useful. The reader first sees how the paths differ, then sees how to package the nominated components without shifting site or design responsibilities.
Compare Both Options before Requesting a Quote
If the project is still deciding between vertical and horizontal, compare the two paths before sending a quote request. Put the vertical option in one block and the horizontal option in another. Name the elevation, orientation, material, finish, sheet group, openings, junction trims and unresolved questions for each.
If the design uses both orientations, treat them as two live paths in one order. Attach elevations that show where each starts and stops, mark the transition line and list custom pressings as separate items. The enquiry should make it clear which pieces are sheets, which pieces are folded trims and which questions remain with the design team.
Once the orientation schedule is ready, Contact us to send elevations, orientation notes, sheet quantities and finish selections.

Leave A Comment